Adding insulated siding to your home can make it more energy-efficient and durable. This DIY project can also enhance your home’s look and feel.
This guide will help you confidently install siding. We’ll cover everything from start to finish. You’ll learn how to prepare and install DIY insulated siding successfully.


Key Takeaways
- Understand the benefits of insulated siding for your home.
- Learn the steps involved in the siding installation process.
- Discover how to prepare your home for insulated siding installation.
- Gain confidence in your ability to complete a DIY insulated siding project.
- Improve your home’s energy efficiency and durability.
Understanding Insulated Siding
Insulated siding is a mix of function and energy saving. It’s a great choice for homeowners. It keeps your home’s inside and outside temperatures separate.
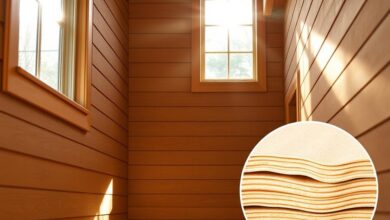
What Is Insulated Siding and Its Benefits
Insulated siding has insulation on the back of the siding. This setup cuts down on heat loss in winter and heat gain in summer. It means lower energy bills for you. It also improves energy efficiency, reduces noise, and lasts longer.
Types of Insulated Siding Available
There are many kinds of insulated siding out there. You can choose from foam-backed vinyl siding and insulated fiber cement siding. Here’s a quick look at some common ones:
| Type | Material | Characteristics |
|---|---|---|
| Foam-Backed Vinyl Siding | Vinyl with foam insulation | Energy-efficient, durable |
| Insulated Fiber Cement Siding | Fiber cement with insulation | Resistant to pests and fire |
| Insulated Engineered Siding | Various materials with insulation | Customizable, high-performance |
Preparing for Your Insulated Siding Project
To make your insulated siding installation go smoothly, preparation is key. Good planning saves time and avoids problems during the project.
Tools and Materials Needed
First, gather the right tools and materials for your project. You’ll need insulated siding panels, a tape measure, a level, a utility knife, and a hammer. Also, have fasteners and flashing materials ready.
Here’s a basic list of what you’ll need:
| Tools | Materials |
|---|---|
| Tape measure | Insulated siding panels |
| Level | Fasteners (nails or screws) |
| Utility knife | Flashing materials |
| Hammer | House wrap |
Measuring Your Home and Calculating Materials
Getting accurate measurements is vital for calculating materials. Measure each wall’s length and width. Remember to include windows, doors, and other features that will affect the siding.
Calculating the total area: Multiply the length by the height for each wall section. Then, add these areas together to find the total square footage. Subtract the areas of windows and doors.
Safety Considerations and Precautions
When preparing for and during the installation, safety comes first. Wear gloves, safety glasses, and a dust mask. Make sure your workspace is clean and free of debris to avoid accidents.
Some key safety precautions include:
- Using ladders and scaffolding safely
- Avoiding overreaching while on ladders
- Keeping the workspace clean and clear
- Wearing appropriate protective gear
How to Install Insulated Siding: The Process Overview
Installing insulated siding is a detailed process. It starts with getting your home’s exterior ready. This step is key for a successful install that boosts energy efficiency and durability.
Removing Old Siding (If Necessary)
The first step is removing the old siding if it’s there. You’ll need to carefully take off the old siding to avoid harming the walls. It’s important to check the walls for any damage or rot during this time.
Inspecting and Repairing the Wall Surface
After removing the old siding, you’ll need to inspect the wall surface for damage. Any damaged spots must be fixed to create a strong base for the new siding. This step is key to avoiding future issues like water damage or structural problems.
Installing House Wrap and Flashing
Next, you’ll install house wrap and flashing. House wrap keeps moisture out, and flashing directs water away from windows and doors. It’s important to install these correctly to keep your home’s exterior strong.
| Step | Description | Importance |
|---|---|---|
| Removing Old Siding | Carefully remove existing siding to inspect the wall surface. | High |
| Inspecting and Repairing | Inspect for damage and repair any rotten or damaged areas. | High |
| Installing House Wrap and Flashing | Install house wrap and flashing to prevent water intrusion. | Critical |
A top contractor says, “A well-prepared surface is essential for a successful insulated siding install.” Good preparation not only makes the siding last longer but also improves its energy efficiency.
Step-by-Step Installation Guide
To get a professional look, follow a step-by-step guide for installing insulated siding. This guide will help you from start to finish.
Installing Starter Strips and Corner Posts
Start by installing starter strips and corner posts. They are key for a solid base for the siding. Starter strips go along the wall’s bottom edge, and corner posts cover the corners.
To install starter strips: Snap a chalk line along the wall’s bottom edge. Make sure the strip is level and fastened well to the wall.
For corner posts: Measure the wall’s height to cut the post right. Secure it to the corner, making sure it’s straight and aligned.

Cutting and Fitting Insulated Siding Panels
Cutting and fitting panels need precision for a good fit around windows and doors. Use a circular saw or utility knife for cutting.
Remember to leave a 1/4 inch gap for expansion and contraction. This gap is important for the siding’s longevity.
“Properly fitting siding panels is key to preventing water damage and ensuring the siding lasts long.” – Expert in Siding Installation
Securing Panels to the Wall
After fitting the panels, secure them to the wall. Use siding nails or screws for this.
Follow the manufacturer’s advice for fastener type and spacing. This ensures a strong and lasting installation.
| Fastener Type | Recommended Spacing | Application |
|---|---|---|
| Siding Nails | 12-16 inches | General Siding Installation |
| Siding Screws | 8-12 inches | Areas with High Winds or Extreme Weather |
Working Around Windows, Doors, and Fixtures
Working around windows, doors, and fixtures is tricky. It needs careful measurement and cutting for a perfect fit.
Use a J-channel or utility trim to seal these areas. This ensures the siding is weatherproofed.
By following these steps and focusing on details, you can achieve a professional finish with your insulated siding.
Troubleshooting and Finishing Touches
The final stages of installing insulated siding involve troubleshooting common problems and adding the finishing touches. This step is key to making sure your siding is both strong and looks great.
Common Installation Problems and Solutions
Several issues can pop up during installation, like uneven panels, gaps, or panels not lining up right. It’s important to find out why and fix it right.
- For uneven panels, check the starter strips and corner posts for proper alignment.
- Gaps between panels can be filled with caulk or adjusted by repositioning the panels.
- Improper alignment can often be corrected by rechecking the measurements and adjusting the panels.
Installing Trim and J-Channels
Trim and J-channels are key to finishing off your insulated siding. Here’s how to install them right:
- Measure and cut the trim and J-channels to the required length.
- Secure them to the wall using the appropriate fasteners.
- Ensure a snug fit around windows, doors, and other fixtures.
Sealing and Weatherproofing Tips
To keep your insulated siding lasting, sealing and weatherproofing are essential. Use top-notch caulk for gaps and joints, and a weatherproof coating to shield the siding from the weather.
Key weatherproofing tips:
- Seal all joints and gaps with caulk.
- Apply a weatherproof coating to the siding.
- Regularly inspect the siding for signs of wear or damage.
Conclusion
Now you’re ready to install your insulated siding with confidence. This siding boosts your home’s energy efficiency and durability. It’s a great choice for those looking to improve their home’s energy use.
Getting it right is key to enjoying these benefits. With insulated siding, you’ll save on energy costs and enjoy a cozier home. You should be proud of your DIY success, knowing you’ve made your home better and more valuable.
Remember, insulated siding is good for your wallet and the planet. It’s a wise choice for homeowners in the U.S. looking to make a positive impact.